
Home Products Technical Support Global Network About Us
Home > Products > Product Category > Switches > Push Buttons / Indicator Lamps > φ30 Type > A30NS / A30NW
30-mm dia. Knob-type Selector
Switches Control panel
miniaturization through a more
compact design and modified wiring
direction. Addition of Push-In Plus
terminal blocks for easy wiring.
Workability and safety improvements.
Item list of A30NS / A30NW
about this Product Family
Inquiry of this Product
Related Contents
Common (4)
Push Buttons / Indicator
Lamps (2)
Please click image to enlarge (open in a new window).
Please click image to enlarge (open in a new window).
Please order Operation Units, LED lamps (lighted models only), Mounting Collars, Contact Blocks, and Lighting Units
(lighted models only) separately. LED lamps, Mounting Collars, Contact Blocks, and Lighting Units can also be used with
the A22N series.
last update: October 03, 2016
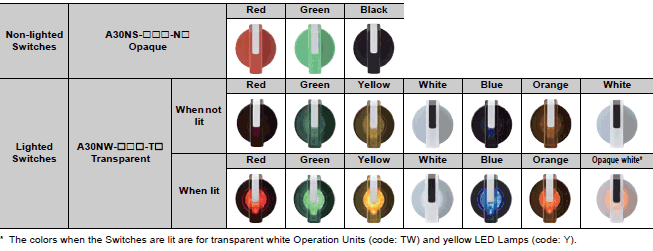
Operation Unit Colors
List of Models
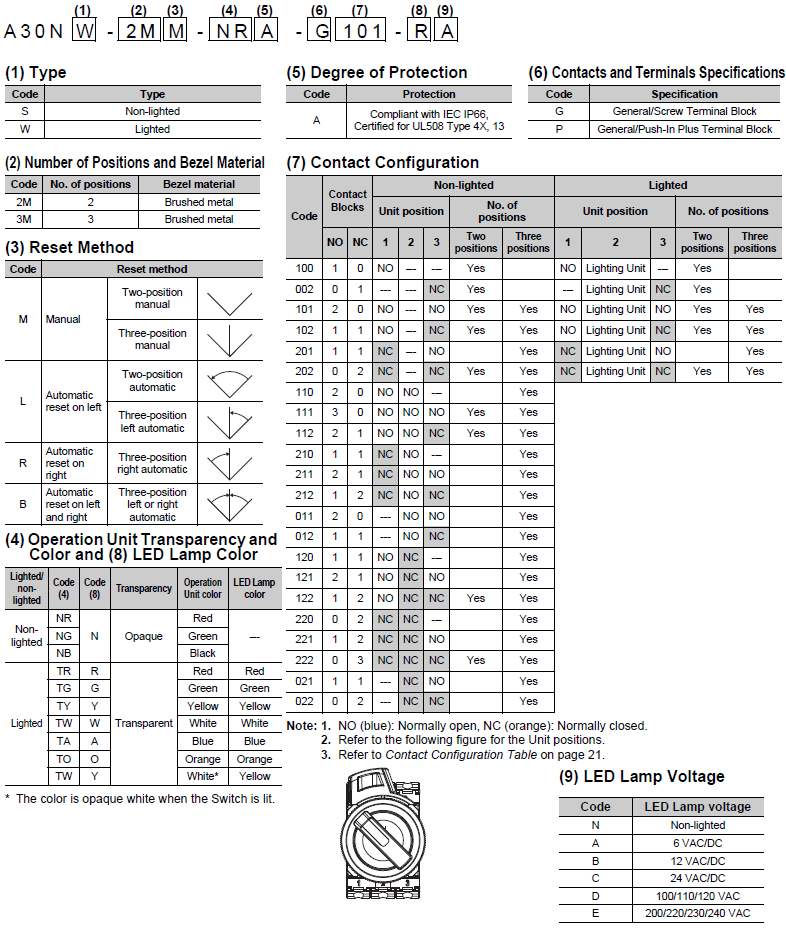
Model Number Structure
Model Number Legend
Model Numbers for Sets
Product Category
Switches
Push Buttons / Indicator
Lamps
φ30 Type
A30NN / A30NL
A30NS / A30NW
A30NK
Product Category
Cautions
Item A to Z Index
Applications
Correction Notice
A30NS / A30NW
Selector Switches
Features Lineup Specifications Dimensions Accessory Catalog
Search
Global Contact

Please click image to enlarge (open in a new window).
Shipped as a set that includes the Operation Unit, Mounting Collar, and Contact Block.
Appearance Bezel
material
No. of
outputs Model
(3)
Reset
method
(4)(4)
Operation Unit
color
(7)(7)(7)
Contact
configuration
Brushed metal
bezels
2M 1A30NS-2M(3)-
(4)(4)A-G(7)(7)(7)-NN
M: Manual
L: Automatic
reset on left
NR: Opaque red
NG: Opaque green
NY: Opaque yellow
NW:Opaque white
NA: Opaque blue
NB: Opaque black
100
002
A30NS-2M(3)-
(4)(4)A-P(7)(7)(7)-NN
2A30NS-2M(3)-
(4)(4)A-G(7)(7)(7)-NN
102
101
202
A30NS-2M(3)-
(4)(4)A-P(7)(7)(7)-NN
3A30NS-2M(3)-
(4)(4)A-G(7)(7)(7)-NN
111
222
122
112
A30NS-2M(3)-
(4)(4)A-P(7)(7)(7)-NN
Appearance Bezel
material
No. of
outputs Model
(3)
Reset
method
(4)(4)
Operation Unit
color
(7)(7)(7)
Contact
configuration
Brushed metal
bezels
3M 2A30NS-3M(3)-
(4)(4)A-G(7)(7)(7)-NN
M: Manual
L: Automatic
reset on left
R: Automatic
reset on right
B: Automatic
reset on left
and right
NR: Opaque red
NG: Opaque green
NY: Opaque yellow
NW:Opaque white
NA: Opaque blue
NB: Opaque black
110
011
101
220
022
202
120
102
210
201
012
021
A30NS-3M(3)-
(4)(4)A-P(7)(7)(7)-NN
3A30NS-3M(3)-
(4)(4)A-G(7)(7)(7)-NN
111
222
122
212
221
211
121
112
A30NS-3M(3)-
(4)(4)A-P(7)(7)(7)-NN
Shipped as a set that includes the Operation Unit, LED Lamp, Mounting Collar, Contact Block, and Lighting Unit.
Bezel material : 2M
Appearance No. of
outputs Model
(3)
Reset
method
(4)(4)
Operation Unit
color
(7)(7)(7)
Contact
configu-
ration
(8)
LED
Lamp
color
(9)
LED Lamp
voltage
Brushed metal
bezels
1A30NW-2M(3)-
(4)(4)A-G(7)(7)(7)-
(8)(9)
M: Manual
L: Automatic
reset on left
TR: Transparent
red
TG: Transparent
green
TY: Transparent
yellow
TW:Transparent
white
TA: Transparent
blue
TO: Transparent
orange
100
002
R: Red
G: Green
Y: Yellow
A: Blue
O: Orange
W:White
A: 6 VAC/DC
B: 12 VAC/DC
C: 24 VAC/DC
D: 100/110/
120 VAC
E: 200/220/
230/240 VAC
A30NW-2M(3)-
(4)(4)A-P(7)(7)(7)-
(8)(9)
2A30NW-2M(3)-
(4)(4)A-G(7)(7)(7)-
(8)(9)
102
101
202
A30NW-2M(3)-
(4)(4)A-P(7)(7)(7)-
Ordering Information
Model Numbers for Sets
Non-lighted, Two-position, Selector Switches
Non-lighted, Three-position, Selector Switches
Model Numbers for Sets
Lighted, Two-position, Selector Switches

(8)(9)
Bezel material : 3M
Appearance No. of
outputs Model
(3)
Reset
method
(4)(4)
Operation Unit
color
(7)(7)(7)
Contact
configu-
ration
(8)
LED
Lamp
color
(9)
LED Lamp
voltage
Brushed metal
bezels
2A30NW-3M(3)-
(4)(4)A-G(7)(7)(7)-
(8)(9)
M: Manual
L: Automatic
reset on left
R: Automatic
reset on right
B: Automatic
reset on left
and right
TR: Transparent
red
TG: Transparent
green
TY: Transparent
yellow
TW:Transparent
white
TA: Transparent
blue
TO: Transparent
orange
101
202
102
201
R: Red
G: Green
Y: Yellow
A: Blue
O: Orange
W:White
A: 6 VAC/DC
B: 12 VAC/DC
C: 24 VAC/DC
D: 100/110/
120 VAC
E: 200/220/
230/240 VAC
A30NW-3M(3)-
(4)(4)A-P(7)(7)(7)-
(8)(9)
Note: Normally, the Operation Unit and LED Lamp with the same color are combined.
However, opaque white is available by combining a white Operation Unit and yellow LED. A30N[]-[][][]-TWA-[][][][]-Y[]
Please order Operation Units, LED lamps (lighted models only), Mounting Collars, Contact Blocks, and Lighting Units
(lighted models only) separately. LED lamps, Mounting Collars, Contact Blocks, and Lighting Units can also be used with
the A22N series.
Please click image to enlarge (open in a new window).
Bezel material and shape
Brushed metal
No. of
positions Reset method Operation
Unit color Model
2Manual
Opaque red
A30NZ-2MM-NRA
Automatic reset on left A30NZ-2ML-NRA
3
Manual A30NZ-3MM-NRA
Automatic reset on left A30NZ-3ML-NRA
Automatic reset on right A30NZ-3MR-NRA
Automatic reset on left and right A30NZ-3MB-NRA
2Manual A30NZ-2MM-NGA
Automatic reset on left A30NZ-2ML-NGA
Lighted, Three-position, Selector Switches
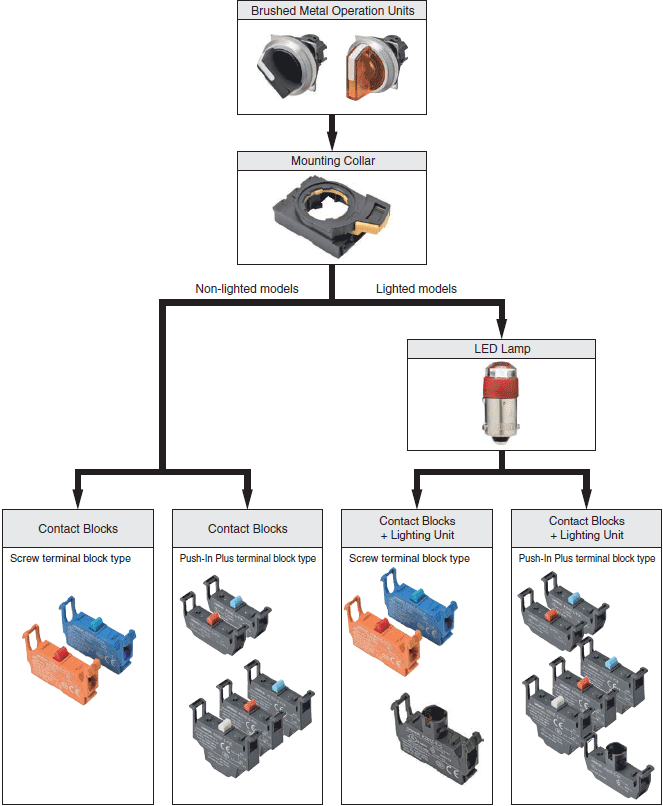
Subassemblies
Operation Units
Non-lighted Switches

Opaque green
3
Manual A30NZ-3MM-NGA
Automatic reset on left A30NZ-3ML-NGA
Automatic reset on right A30NZ-3MR-NGA
Automatic reset on left and right A30NZ-3MB-NGA
2Manual
Opaque yellow
A30NZ-2MM-NYA
Automatic reset on left A30NZ-2ML-NYA
3
Manual A30NZ-3MM-NYA
Automatic reset on left A30NZ-3ML-NYA
Automatic reset on right A30NZ-3MR-NYA
Automatic reset on left and right A30NZ-3MB-NYA
2Manual
Opaque white
A30NZ-2MM-NWA
Automatic reset on left A30NZ-2ML-NWA
3
Manual A30NZ-3MM-NWA
Automatic reset on left A30NZ-3ML-NWA
Automatic reset on right A30NZ-3MR-NWA
Automatic reset on left and right A30NZ-3MB-NWA
2Manual
Opaque blue
A30NZ-2MM-NAA
Automatic reset on left A30NZ-2ML-NAA
3
Manual A30NZ-3MM-NAA
Automatic reset on left A30NZ-3ML-NAA
Automatic reset on right A30NZ-3MR-NAA
Automatic reset on left and right A30NZ-3MB-NAA
2Manual
Opaque black
A30NZ-2MM-NBA
Automatic reset on left A30NZ-2ML-NBA
3
Manual A30NZ-3MM-NBA
Automatic reset on left A30NZ-3ML-NBA
Automatic reset on right A30NZ-3MR-NBA
Automatic reset on left and right A30NZ-3MB-NBA
Bezel material and shape
Brushed metal
No. of
positions Reset method Operation
Unit color Model
2Manual
Transparent red
A30NZ-2MM-TRA
Automatic reset on left A30NZ-2ML-TRA
3
Manual A30NZ-3MM-TRA
Automatic reset on left A30NZ-3ML-TRA
Automatic reset on right A30NZ-3MR-TRA
Automatic reset on left and right A30NZ-3MB-TRA
2Manual
Transparent green
A30NZ-2MM-TGA
Automatic reset on left A30NZ-2ML-TGA
3
Manual A30NZ-3MM-TGA
Automatic reset on left A30NZ-3ML-TGA
Automatic reset on right A30NZ-3MR-TGA
Automatic reset on left and right A30NZ-3MB-TGA
2Manual
Transparent yellow
A30NZ-2MM-TYA
Automatic reset on left A30NZ-2ML-TYA
3
Manual A30NZ-3MM-TYA
Automatic reset on left A30NZ-3ML-TYA
Automatic reset on right A30NZ-3MR-TYA
Automatic reset on left and right A30NZ-3MB-TYA
2Manual
Transparent white
A30NZ-2MM-TWA
Automatic reset on left A30NZ-2ML-TWA
3
Manual A30NZ-3MM-TWA
Automatic reset on left A30NZ-3ML-TWA
Automatic reset on right A30NZ-3MR-TWA
Automatic reset on left and right A30NZ-3MB-TWA
2Manual
Transparent blue
A30NZ-2MM-TAA
Automatic reset on left A30NZ-2ML-TAA
3
Manual A30NZ-3MM-TAA
Automatic reset on left A30NZ-3ML-TAA
Automatic reset on right A30NZ-3MR-TAA
Automatic reset on left and right A30NZ-3MB-TAA
2Manual A30NZ-2MM-TOA
Automatic reset on left A30NZ-2ML-TOA
Lighted Switches

Transparent orange
3
Manual A30NZ-3MM-TOA
Automatic reset on left A30NZ-3ML-TOA
Automatic reset on right A30NZ-3MR-TOA
Automatic reset on left and right A30NZ-3MB-TOA
You can order Operation Units, LED Lamps, Mounting Collars, and Contact Blocks individually. Use them in combination
for models that are not available as assembled Units. These can also be used as inventory for maintenance parts.
Appearance
Rated
voltage Model
Color 6 VAC/DC 12 VAC/DC 24 VAC/DC 100/110/120
VAC
200/220/230/
240 VAC
Red A22NZ-L-RA A22NZ-L-RB A22NZ-L-RC A22NZ-L-RD A22NZ-L-RE
Green A22NZ-L-GA A22NZ-L-GB A22NZ-L-GC A22NZ-L-GD A22NZ-L-GE
Yellow A22NZ-L-YA A22NZ-L-YB A22NZ-L-YC A22NZ-L-YD A22NZ-L-YE
White A22NZ-L-WA A22NZ-L-WB A22NZ-L-WC A22NZ-L-WD A22NZ-L-WE
Blue A22NZ-L-AA A22NZ-L-AB A22NZ-L-AC A22NZ-L-AD A22NZ-L-AE
Orange A22NZ-L-OA A22NZ-L-OB A22NZ-L-OC A22NZ-L-OD A22NZ-L-OE
Appearance Model
A22NZ-H-01
Appearance Terminals Specifications Contacts Model
Screw terminal block SPST-NO (blue) A22NZ-S-G1A
SPST-NC (orange) A22NZ-S-G1B
Push-In Plus terminal block SPST-NO (blue) A22NZ-S-P1A
SPST-NC (red) A22NZ-S-P1B
Push-In Plus terminal block DPST-NO (blue) A22NZ-S-P2A
DPST-NC (red) A22NZ-S-P2B
SPST-NO/SPST-NC (white) A22NZ-S-P2C
Appearance Terminals Specifications Rated voltage Model
Screw terminal block 6 VAC/DC A22NZ-T-A
12 VAC/DC A22NZ-T-B
24 VAC/DC A22NZ-T-C
100/110/120 VAC A22NZ-T-D
200/220/230/240 VAC A22NZ-T-E
Push-In Plus terminal block 6 VAC/DC A22NZ-T-AP
12 VAC/DC A22NZ-T-BP
24 VAC/DC A22NZ-T-CP
100/110/120 VAC A22NZ-T-DP
200/220/230/240 VAC A22NZ-T-EP
Subassemblies (Common)
Subassemblies
LED Lamps
Mounting Collar
Contact Blocks
Lighting Units
last update: October 03, 2016


